Awesome Mom: Small Victories in the World of Parenting

The time I became an Awesome Mom!

#SundayFunday: Miniature Bird Houses

Painting Miniature Birdhouses for #SundayFunday Crafts.

Turning Me-Can'ts into I Cans

Inspiring confidence in your kids

#SundayFunday: Pet Rocks

#SundayFunday Craft Time: Pet Rocks - The Pet you never have to feed!

Showing posts with label #SundayFunday. Show all posts

Sunday, February 7, 2016

#SundayFunday: Mason Jar Garden

Easy Indoor Herb Garden Project

#SundayFunday Mason Jar Garden
#SundayFunday: Mason Jar Garden


I'm a little under the weather today.  Stress levels up, energy (and caffeine levels) down, and a bit of a migraine.

I flop down on the bed next to J, who is engaged in gaming, and start pondering #SundayFunday activites, that I don't have to go to the store to buy stuff for. (I really should start planning further in advance)

"I want to make backdrops, but don't want to go buy sheets.  I have jello jigglers, pop corn balls, and rice crispy treats to make, but the jello takes forever....I  could set up decopage for them to make Valentine's day coasters...."

Up and off the bed to find decopage.  In the 'annex', mason jars catch my eye.  Oh, yeah, I did plan ahead!

A few weeks back, J suggested that the kids and I do an indoor herb garden as a #SundayFunday craft.  It sounded great, and last week Dollar Tree had planning stuff out.  (With six kids, Amazon and Dollar Tree are my FRIENDS!).

I researched some planting methods, and decided that Steve Spangler offered some great tips, and  experimentation component. (We're huge Spangler fans lol)


NECESSITIES:
Water gel beads and/or potting soil
Mason, Jelly, or baby food jars
Seeds (or if doing this as a classroom class that will be an immediate gift, like Valentine's Day, small flowers or plants)

Yay, Dollar Tree!

OPTIONAL:
Chalkboard paint
Food coloring


HOW TO:

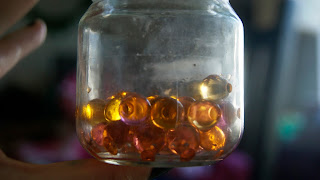
We began by separating the gel beads into bowls and adding food coloring to enhance the fun.  Ours were already water-filled, but some brands need to be soaked first.

We lined the bottom of our mason jars will gel beads in the chosen colors.  I gave the kids the option of turning this into an experiment:
  • Use the new, colorful gel beads alone
    Food coloring turns water gels into a pretty, colorful plant base.
    Food coloring gave us pretty colors
  • Use trustworthy potting soil
  • Use a mixture of both
For the kids who decided to use both, they could either layer the soil over the beads, or mix them together.

We then took about 5 seeds of their chosen type (We used basil, sweet basil, oregano, thyme, cilantro, and chives so that the kids could then use them in cooking!) and inserted into their chosen planting source.


Water gel and potting soil


I painted a small area of the jar with chalkboard paint, and, when dry, chalked their name and plant on each respective jar.
Mason jars with water gel beads or soil make a pretty garden
Pretty indoor mason jar garden


To start our seedlings, we place them in Memaw's Greenhouse, but they can easily be put on a windowsill or shelf in a sunny spot. I plan on making a cute shelf for ours very soon.

It's going to be fun to watch them grow, and see which planting option works best!

UPDATE:
One week after planting, we are seeing sprouts!  It's so cool to see them growing!


Monday, January 18, 2016

#SundayFunday: Miniature Bird Houses


A Cute birthday birdhouses

An easy, inexpensive craft project for kids


a small birdhouse and some paint make an inexpensive weekend craft project
This inexpensive bird hose and some paint make a great kid's project


Grampy's birthday is next weekend, so we decided to make birthday presents for #SundayFunday.  Gramps is an avid birdwatcher, and a huge Dallas Cowboys fan, so we whipped up some mini birdhouses, in blue, white, and grey.

These birdhouses can be found in Walmart in the craft aisle, or get a dozen in bulk straight to your door from Amazon.   The paints are also available from Walmart or from amazon - we chose patio and outdoor paint.


The project itself was pretty straight forward and easy, so in general, I would let the kids paint them as they pleased, but today, the big kids and I provided slightly more supervision.

Using our Dallas colored paint, we painted our birdhouses appropriate colors.


For an additional personal touch, I painted each kid's hand in a contrasting color, and placed it on the back, side, or roof of the house.

We then allowed the houses to dry.  For houses that will be exposed to the elements, it is suggested that you follow up with a clear coat varnish or protestant.


I'd love to see your completed birdhouses! Share them in the comments below!


Tuesday, January 12, 2016

#SundayFunday: Pet Rocks

The pet you never have to feed!

www.mommyneedsavodkabreak.com, http://mommyneedsavodkabreak.blogspot.com
A  pet rock family, made by a 3 yr old.

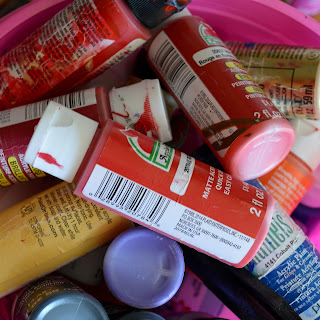
Today's goal was an easy, cheap project, that allowed for lots of mess! (Because, let's be honest, mess is the kids' favorite part.) We settled on Pet Rocks, because they're fun, there's paint involved, and they are SOOO cheap. They are made, literally, with stuff from your back yard, plus few things most moms have around the house. If, however, you are needing supplies, the amazon ad below has them all listed, as does the Mommy Must Have's store. You can also mosey on down to WalMart.


Supplies


Supplies:


 craft paint www.mommyneedsavodkabreak.com, http://mommyneedsavodkabreak.blogspot.com
Every mom needs a bucket of these.
  • Rocks (1-2 per kid) - flat surfaced one's look best
  • Paint- Washable
  • Paint brushes
  • Googly eyes or buttons
  • Paper or cloth
  • Sharpies
  • Glue


Pick Some Pets

Wander out to the nearest rock quarry....or your yard, whichever is most convenient. Choose the rocks the kiddos want to adopt.


www.mommyneedsavodkabreak.com, http://mommyneedsavodkabreak.blogspot.com
Your Pets need a bath...


Your new pets will be slightly (or really) dirty, so give them a good bath, then dry them off.
www.mommyneedsavodkabreak.com, http://mommyneedsavodkabreak.blogspot.com
Give them a good Bath


Paint

Prep your work area, and pull out the paint. Let the messiness begin!

www.mommyneedsavodkabreak.com, http://mommyneedsavodkabreak.blogspot.com
Painting time. 


Once the first side is painted, it will need to dry. This is a good time for snack and naps!


Paint the other side, and more drying....
This may be a good point for Doc McStuffin's Operation, which is currently our favorite game...

www.mommyneedsavodkabreak.com, http://mommyneedsavodkabreak.blogspot.com
We used this time to play Ninja Turtle.


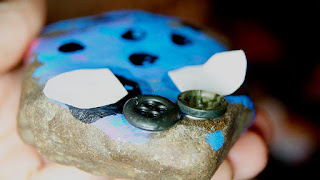
Buttons make great eyes

Give Them Some Personality

Once all sides are dry, create your pets.


The Sharpies are perfect for drawing faces, spots, feet etc. Give your pets some personality!

www.mommyneedsavodkabreak.com, http://mommyneedsavodkabreak.blogspot.com
Give your pet a face and personality


Glue on buttons or googly eyes for eyes.


Cut ears out of paper or material and glue them on to your pets!  Floppy  cloth ears are the CUTEST (Craft felt is great for this!), and Paper makes great stand up ears like mouse, rabbit, or cat ears.

www.mommyneedsavodkabreak.com, http://mommyneedsavodkabreak.blogspot.com
We used paper, but felt would have made better ears


Give Them A Home


While the glue dries, you may choose to make a habitat or bed for your new pet.  We decided to forgoe this, however, in favor of dinner, baths, and bed.

www.mommyneedsavodkabreak.com
A Pet Rock Mouse


Now, name your pets, and make sure to give them lots of love and care!!


We'd love to hear  and see how your pet rocks turned out! Share in the comments below!